I started to notice an issue with how I interacted with the internet. This started specifically with how I was getting my news. Originally, I was visiting several different sites ranging from tech sites, world news sites, and individual blogs for different programmers I followed.
This slowly devolved into an impulse whenever I was idle. "Oh I haven't checked this site in a while let me visit again and see if anything was new". This thought process is notorious because it is the impulse that drives us to visit social media.
Just as the saying goes: 'The idle mind is the devil's play thing' soon I found myself following my news sources on Facebook and Twitter and visiting social media for my news.
This idle process people go through where they end up on Facebook is something I seek to minimize, as should everyone, and with more outcomes leading to social media more thought processes lead to them. I shortly realized the best first step to reducing my usage of social media was to first tackle how I get my news.
RIP Google Reader
I sorely miss Google Reader, it truly was the best RSS reader in terms of UI, ease of use, and accessibility. If you haven't used RSS before I highly recommend looking into it as it is a fantastic way to consolidate all of your news sources while also happily avoiding all those annoying ads, trackers and cookie pop-ups you see on every. single. webpage.
Docker to the rescue
In my previous post, I mentioned how I use docker on my DigitalOcean Droplet to make hosting Nextcloud turn-key easy. I recently read about NGinx Proxy Manager which facilitates hosting multiple docker services on a single host.
When you expose a docker service it will be routed like an individual service, if you want to expose it over the internet you will have to pass one of the hosts ports through to it, or run it with the network set to host which also will consume a port.
This can become problematic as the more ports you expose the larger your attack surface. Similarly, all of these open ports are vulnerable to leaking what type of services you are running without significant effort put into hardening each service.
When using NGinx as a proxy, you only expose ports 80 and 443 (http and https). NGinx will then internally route requests to these ports depending on the requested domain.
Setting up NGinx Proxy Manager
I am assuming you already have a VPS or docker host setup on your local network. If you do not, consider setting up a 5$ droplet with DigitalOcean, my current favorite hosting provider.
You can then follow along using my previous post to finalize your droplet's setup, install docker and install docker-compose.
I like to store volumes for each of my services in my non-root user's home directory. We will start with NGinx Proxy Manager (NPM). Create a directory called NPM and inside of it create a directory called data for the bind mount.
mkdir -p ~/NPM/dataFinally you can use this docker-compose template as an example to work from. I placed this in ~/NPM/.
version: "3"
services:
  app:
    image: 'jc21/nginx-proxy-manager:latest'
    restart: always
    ports:
      # Public HTTP Port:
      - '80:80'
      # Public HTTPS Port:
      - '443:443'
      # Admin Web Port:
      - '81:81'
    environment:
      # These are the settings to access your db
      DB_MYSQL_HOST: "db"
      DB_MYSQL_PORT: 3306
      DB_MYSQL_USER: "npm" # change this
      DB_MYSQL_PASSWORD: "npm" # change this
      DB_MYSQL_NAME: "npm" # should change this
      # If you would rather use Sqlite uncomment this
      # and remove all DB_MYSQL_* lines above
      # DB_SQLITE_FILE: "/data/database.sqlite"
      # Uncomment this if IPv6 is not enabled on your host
      # DISABLE_IPV6: 'true'
    volumes:
      - /home/${USER}/NPM/data:/data
      - /home/${USER}/NPM/letsencrypt:/etc/letsencrypt
    depends_on:
      - db
  db:
    image: 'jc21/mariadb-aria:latest'
    restart: always
    environment:
      MYSQL_ROOT_PASSWORD: 'npm' # make this something secure
      MYSQL_DATABASE: 'npm' # match DB_MYSQL_NAME
      MYSQL_USER: 'npm' # match DB_MYSQL_USER
      MYSQL_PASSWORD: 'npm' # match DB_MYSQL_PASSWORD
    volumes:
      - /home/${USER}/NPM/data/mysql:/var/lib/mysql
From NPM docs
Finally, run this by cd'ing into ~/NPM/ and typing docker-compose up -d.
When the everything is ready you can reach NPM from your droplet's ip address at port 81.
eg. http://873.242.482.16:81
Initial Configuration

Login with
Email:    [email protected]
Password: changeme
And you will be prompted to input an email and password for your account. Once finished you will be logged out, sign back in with your new credentials.
Securing the Admin Panel
Before we get started adding routes to our other docker applications we should first run the NPM admin page through the proxy itself. We have options here, we can 'proxy' web requests to our host's public IP address however this would defeat much of the advantage of putting a proxy in front of our services.
Instead, we can proxy through to docker's internal network such that we dont have to expose our other containers to the internet. This effectively exposes only ports 80 and 443 from our host which is a big security win!
Internally routing the proxy
We can find the address range of our Docker network using ip.
$ ip addr show docker0
4: docker0: <BROADCAST,MULTICAST,UP,LOWER_UP> mtu 1500 qdisc noqueue state UP group default
    link/ether 02:42:1f:a8:4b:18 brd ff:ff:ff:ff:ff:ff
    inet 172.17.0.1/16 brd 172.17.255.255 scope global docker0
       valid_lft forever preferred_lft forever
    inet6 fe80::42:1fff:fea8:4b18/64 scope link
       valid_lft forever preferred_lft forever
The inet line gives us the ipv4 address of the internal docker host. In fact, if your user is in the docker group you should be able to ping/telnet addresses on the docker network and get responses to confirm they are addressable. Take note of this internal address because we will be using it a lot later on.
DNS Changes
Nginx proxy manager is only beneficial if you have a domain. If you dont have one already I recommend namecheap. I really like their customer service, and they had very competitive private email pricing.
Once you have your domain log in and look through the menus for where you can configure your DNS settings. In here you are going to create either an A or CNAME record that points to the external IP address of your host.
You can easily find your IP address by running curl -4 icanhazip.com from your host.
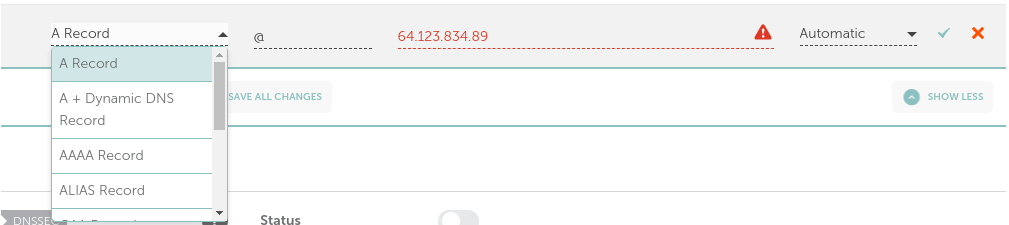
In the above screenshot I have set an A record that redirects @ to an imaginary IP address.
In case you were wondering @ will redirect anything(ie. *.example.com) to the specified IP, giving full control to NPM to route our requests.
Once this is set it will take a 5-60 minutes for the change to propagate through all of the DNS servers online.
I personally use cloudflare's 1.1.1.1 as my DNS server and it tends to pick up my changes quickly. I usually can run sudo resolvectl flush-caches on my Fedora machine after 5 minutes or so and see the changes.
You can verify your DNS changes are in effect using dig:
$ dig proxy.example.com

; <<>> DiG 9.16.11-RedHat-9.16.11-5.fc34 <<>> proxy.example.com
;; global options: +cmd
;; Got answer:
;; ->>HEADER<<- opcode: QUERY, status: NOERROR, id: 48811
;; flags: qr rd ra; QUERY: 1, ANSWER: 2, AUTHORITY: 0, ADDITIONAL: 1

;; OPT PSEUDOSECTION:
; EDNS: version: 0, flags:; udp: 65494
;; QUESTION SECTION:
;proxy.example.com.		IN	A

;; ANSWER SECTION:
proxy.example.com.	1799	IN	A	123.456.357.975
If you see the IP address you set in the ANSWER section you are all set. Try browsing to your domain (eg. proxy.example.com and you should see the NGinx Proxy Manager login screen.
The final stretch
Login and click on the "Proxy Hosts" section all the way to the left:
In the top right corner select ADD PROXY HOST. You will see the following:
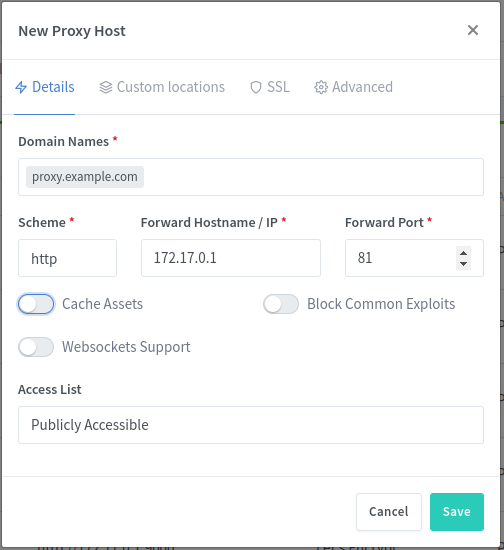
Lets break down the important fields here:
Domain Names: This reads the requested domain from theREQUESTheader of an http packet and redirects it to the hostname/port specified belowScheme: If set tohttp, this will redirect an HTTP request from port80, to the specified hostname/port. If set tohttpsthis will redirect requests from port443to the specified hostname/port.HOSTNAME/IP: This is where NGinx is going to forward the request. It can be any public or private ip address that the NGinx container can see.
In our case, we want to redirect requests for proxy.example.com to 172.17.0.1:81 which is where NPM is running. This is what I have configured above. Once done, hit save and try browsing to proxy.example.com.
If you see the NPM login screen great! You are ready for the next step.
If you do not, try waiting longer for the DNS to refresh or drop comment below. I would be glad to help you out. DNS routing can be frustrating sometimes because you cannot see the effects immediately.
Enabling free HTTPS
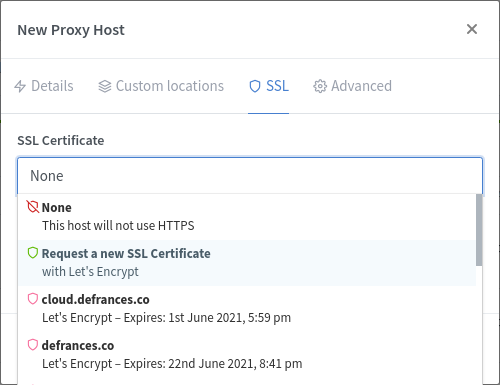
Next, go back to the Proxy Host you just configured and click on the SSL tab. Select 'Request a new SSL Certificate', and flip 'Scheme' to https in the Details tab.
When you hit save, Letsencrypt/ACME will automagically self-sign and validate an SSL certificate for you.
Finally, browse one more time to proxy.example.com and admire your glorious lock icon.
Proxying all of my other services
This process of setting up the other services you have running through Docker will be the same as NPM just with their own unique ports on the docker network.
If you also setup Nextcloud using my previous guide you, like me, will have to change Nextclouds port because NPM will forever occupy 80 /81 /443. This was as simple as editing Nextclouds docker-compose.yml to share to a different port and spinning it back up. eg:
ports:
  - 8080:80
The process we followed above can be repeated for Nextcloud just by changing proxy.example.com to nextcloud.example.com (or anything you want to call it really) and changing the port to match what we exposed (port 8080 in this case).
What else can I run?
Now that I have swanky https on Nextcloud and NPM I can move on to replacing Google Reader. Ultimately I settled on ghcr.io/linuxserver/freshrss and highly recommend it.
This RSS reader has a nice GUI, who's notable feature is that you can choose which content you want to isolate from your rss source using css selectors. This is great for removing pointless content from your news sources such as pictures embedded videos.
Additionally, Freshrss supports the Fever API which lets me read my news via the Readably app on Android. The app was a couple dollars but is cheap enough to be bought with Google Opinion Rewards. The UI/UX design of this application is so good, I would buy it a 2nd time if I could, highly recommended.
The freshrss docker container requests that we specify aPUIDandPGID. These enable a container to run in the same context as our user.
These can be found by logging into the host as your user and running the command below and using theuidandgidfrom the result.
id $USER
uid=1000(user) gid=1000(user) groups=1000(user),27(sudo),999(docker)
Congrats! 🎉️
You are now one to five steps closer to becoming your own Cloud Provider. With the knowledge embodied in this post the sky your ram is the limit!
NPM is quite versatile you can have it route to other IPs (that you own) on the internet. I even have it proxy to my home IP address for storage heavy services I run such as Plex. I also encourage you to poke through the settings, specifically through Redirect Hosts, and 'Default Site' in Settings if you really want to get fancy.
If you are looking for inspiration. Some other things I am running on my Droplet are:
- VaultWarden: Password Manager (Bitwarden compatible backend).
- Gogs: Super lightweight Git Repository.
- Snapdrop: Self-hosted Airdrop alternative.
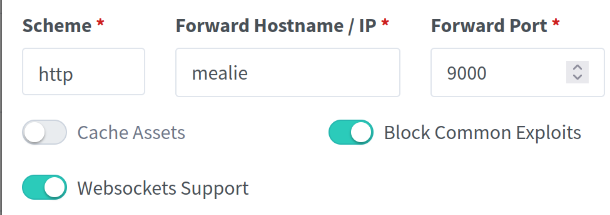
- Mealie: Recipe manager / Meal planner.
- QBittorrent: To seed ALL THE LINUX isos.
If you find something super useful to self host share it in the comments below. Happy Hosting!
Tip: for VaultWarden Users
If you opt to host Vaultwarden behind your proxy and you are accessing it via the Docker Network make sure to enable "Websockets Support" on the "New Proxy Host" page so that Vaultwarden can sync automatically.
You will then want to add the following under the 'Advanced' tab for proxy host.
location /notifications/hub {
    proxy_set_header Upgrade $http_upgrade;
    proxy_set_header Connection "upgrade";
    proxy_http_version 1.1;
    proxy_pass $forward_scheme://$server:3012;
  }

  location /notifications/hub/negotiate {
    proxy_pass $forward_scheme://$server:$port;
  }
Note that this will require you to add the WEBSOCKET_ENABLE: 'true' environment variable. In docker compose it would look like this:
environment:
    WEBSOCKET_ENABLE: 'true'
Tip: Use Docker's DNS
If you find the use of container ip's difficult, you can put your containers onto the same network as nginx proxy manager. This will enable you to route to the containers by their container_name .
If you followed this guide, you will have npm within an nproxy_default network. For any other application you want to join to this network add the following yaml to their compose files.
networks:
  default:
    external:
      name: nproxy_default
When you bring your application back up, you can adjust the nginx configuration to use their container name as if it's an FQDN.